‏إظهار الرسائل ذات التسميات Computer Fundamental. إظهار كافة الرسائل

How to Manage Taskbar Items in Windows

There are so many options for managing taskbar items, which may include customizing notification area icons, showing or hiding system icons on notification area of taskbar and locking and unlocking the taskbar. You can also add or remove different types of toolbars on taskbar and can hide automatically. Here I have described these different ideas for managing taskbar items along with their steps.

How to Customize Notification Area Icons


You can select which icons and notifications appear on notification area of the taskbar by customizing notification area icons setting. You can show icons and notifications, hide icons and notifications or only show notifications about the changes or notifications. If you choose to hide icons and notifications, you won't be notified about changes or updates. You can view the hidden icons at any time by clicking on the arrow next to the notification area on the taskbar. If you have selected the option only show notifications, you will only notified on changes but icons are not shown.

You can change all of these setting from Notification Area Icons option located on Control Panel. Following are the steps to customize notification area icons on taskbar.
    How to Customize Notification Area Icons
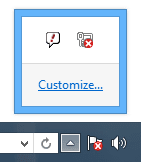
  1. At first go to control panel and click on Notification Area Icons option. OR you can directly click on customize option after clicking on arrow icon on notification area of taskbar.
  2. On Notification Area Icons window, choose the behaviors of icons for specific icons based on whether you want to show or hide icons or notifications on the taskbar.
    How to Customize Notification Area Icons

How to Turn System Icons On or Off on Notification Area


You can show or hide system icons on notification area by turning on or off system icons. Here are the steps for turning system icons on or off on notification area of taskbar.


  1. After opening Notification Area Icons window as mentioned above, click on the option "Turn system icons on or off".
  2. On system icons window, select the system icons behaviors on or off.
    How to Turn System Icons On or Off on Notification Area

How to Lock/Unlock the Taskbar in Windows Desktop


If you unlock the taskbar, you can move it anywhere on left, right, top or bottom even can drag to increase its width.

To unlock the taskbar, go to taskbar, right click on it and unlock the taskbar option. You can also lock it by clicking on the same option again.

How to Lock/Unlock the Taskbar in Windows Desktop

How to Add/Remove Toolbars from Taskbar


You can add or remove toolbars like Address, Links, Touch Keyboard, Desktop and others mannually from taskbar as you want. Here are the steps to Add or Remove toolbars from taskbar.

  1. At first, Right click on taskbar and select on Toolbars option.
  2. Select on the option which toolbar you want to display on taskbar.
    How to Add/Remove Toolbars from Taskbar

How to Auto Hide the Taskbar in Windows


You can make the taskbar, which will hide automatically when not in use and appear again when you mouse over where the taskbar located. You can do the following steps to make auto the taskbar.

  1. Right click on taskbar and select on properties option.
  2. Go to Taskbar tab on Taskbar and Navigation Properties dialog box.
  3. Check the option "Auto-hide the taskbar" to hide taskbar automatically.
    How to Auto Hide the Taskbar in Windows

How to Show Computer Desktop Using Taskbar


If you are working on different multiple windows and you want to close all the windows to show desktop for opening items on desktop.

You can show computer desktop by simply right clicking on taskbar and clicking on "show the desktop" option. Which minimizes all the open windows and shows the desktop.

How to Show Computer Desktop Using Taskbar

How to Manage Drives Using Drive Tools

In the previous post I have posted possible problems and their solutions while operating computer and its windows operating system. In this post I am going to write some ideas or tips to manage drives using drive tool in windows. Drive tools manages drives which helps to run them smoothly. You can optimize the drive to defrag them, run clean up to remove unnecessary files and format to remove all files from drives.

How to Manage Drives Using Drive Tools

Here I have explained in detail with steps to manage drives using drive tools.

# How to Format Drives in Windows

How to Format Drives in Windows
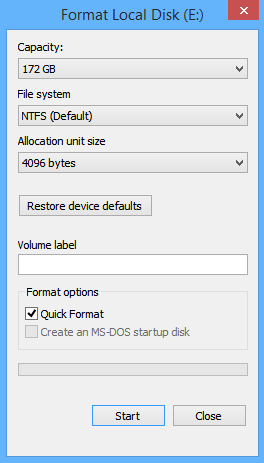
You can format the computer drives along with removable drives like pen drive, if it contents lots of unnecessary files or disk contains viruses or have any problems on computer disks or removable disks.

Here are the steps to format your Drive

  1. Go to "My computer" and select the drive which you want to format
  2. Click on Format option located on manage tab
  3. Under format option dialog box choose the type of format you want to do
  4. Click on Start button to start formatting.

OR you can format the drive just by right clicking on the drive and selecting format option.


# How to Optimize Drives in Windows


You can optimize your drives to help your computer run more efficiently. At first you can analyze the drives to find out if they need to be optimized or not and then optimized them. In optimization process the fragmented files are compressed and make more space available on disk.

Following are the steps to optimize the disk.

  1. Open My computer-select the drive and click on Optimize option located on Manage tab. 
  2. Then, drive optimization dialog box will appear. 
  3. Click on Analyze button to analyze the disk and click on Optimize button to optimize it.
    How to Optimize Drives in Windows

# How to Optimize Drives Automatically


You can optimize the drives automatically by scheduling it. For this,

  1. Open drive optimization dialog box as mentioned above and then click on "Change Setting" button. 
  2. After that, choose "Run on a schedule" option and also select its frequency then choose drives for optimization.
    How to Optimize Drives Automatically

# How to Computer Clean Up


You can clean up your disks or drives to speed up your computer, here are the steps to clean up your disk.You can do it by selecting respective drives and doing clean up using drive tools.

How to Computer Clean Up
For this, open My computer to view drives select required drive you want to clean and click on cleanup option located on manage tab.

How to Computer Clean Up


Related Posts


    How to Keep Computer from Sleeping

    When the computer is not being used for some duration of time i.e. 5, 10 or 15 min, the screen will automatically turned off to save the power used by the computer. It's happened due to what settings are saved on power option on control panel. From this option, you can choose power and display settings that you want on your computer. In this post I am describing "how to keep computer from sleeping" and the other methods to adjust power setting for computer.

    How to Change Sleep and Display Setting


    You can change sleep and display setting to make computer how long time it will display while it is not being used. Here below explained with steps to change its setting.
    1. At first, go to control panel and choose power options. On the power option window, you can see different power plans like balanced, power saver and high performance.
      How to Change Sleep and Display Setting
    2. Click on the option "Choose when to turn off the display" from the left side pane of this window.
      How to Keep Computer from Sleeping
    3. On the Edit plan setting window, you can choose turn of display time for your selected power plan form 1 minute to 5 hours as your requirement also there is a option Never, to never sleep the computer.
      How to Keep Computer from Sleeping

    How to Change Advanced Power Setting


    Along with sleep and display setting you can change other settings also on advanced power setting. You can change setting for different power plans and can also create new power plan.
    1. As given on the first step to change sleep and display setting, open power option window. Click on change plan setting option for which power plan you want to change setting and then click on "change advanced power setting".
    2. On the Advanced setting option you can change the settings for turn off hard disk, slide show, wireless adapter, sleep, display and multimedia.
      How to Change Advanced Power Setting
    3. From power buttons and lid option, you can change the setting for power button action and sleep button action.
    4. On processor power management option, you can choose for minimum processor state, system cooling policy and maximum processor state.

    Related Posts


    How to Share Printer for Computers on LAN

    Not only from Network printer, it is possible to print from other computers on LAN by sharing local printer connected on one computer on Local Area Network. To do this, you have to share the printer on LAN and have to install the shared printer on the computer from which you want to print. In this post I am describing the methods and steps for sharing printers on LAN.

    How to Share a Local Printer on LAN


    Here are some steps for sharing a local printer on Local Area Network.  
    1. At first, Go to the control panel and click on "view devices and printers" located under Hardware and Sound option.
    2. Under the printers category right click on printers name which you want to share and  choose on "printer properties" option. 
      How to Share a Local Printer on LAN
    3. Then printer properties dialog box will appear as given below, click on sharing Tab.
      How to Share a Local Printer on LAN
    4. Select on the "share this printer" option also give the name for the printer which is being shared as given on the picture below. 
    5. After completing all of the task click on OK to close the dialog box.

    How to Install Shared Printer in Client Computer on LAN


    To complete the steps for sharing local computer on LAN and to print through client computer, you have to install this shared printer on the client computer also. The required steps to complete this task are given below.
    1. At first, Go to the control panel as mentioned on the previous steps and click on "Add printer" option.
      How to Install Shared Printer in Client Computer on LAN
    2. The wizard started to search for installed shared printers on LAN, if the printer you have to install is listed select it and go to next until finish.
      How to Install Shared Printer in Client Computer on LAN
    3. If the printer is not listed from searching, Click on the option "The printer that I want isn't Listed".
    4. On find a printer by other options click on "select a shared printer by name" and click on Browse button.
      How to Install Shared Printer in Client Computer on LAN
    5. Open the computer from where you want to install printer, here you may ask for login if the computer having printer is protected by a password.
    6. After opening computer, select the desired printer you want to install and click on next in wizard until finish.
      How to Install Shared Printer in Client Computer on LAN
    7. Now your printer is ready, you can print any document selecting on this printer but you should be noted that the host computer must be turned on while printing.


    Related Posts


    How to Share Drive Folder and File in Computer Network

    You can share drives, folders and files of your PC to your Computer Network, after sharing these, you can access them from another computers in same computer network. It can be shared for specific computer or for everyone as your requirement. But you should be careful for security of your files, folders and drives while sharing them on the network. Today I am going to describe some methods for sharing drives, folders and files in computer network.

    How to Share Drive in Computer Network


    You can share your computer drive in computer network, using the following methods.


    1.   At first Go to "My Computer" from Desktop or Start Menu and Open it.
    2.  Right Click on the required drive which you want to share and Choose "Share width" and the "Advanced sharing.." As given below.
      How to Share Drive in Computer Network
    3.  After that, drive properties window will appear, then click on "Advanced sharing" button.
    4. That displays advanced sharing dialog box then select on the "Share this folder" check box, give required comments and the share name as given on the screen below.
      How to Share Drive in Computer Network
    5.  After completing all of these click on OK button.

    How to Share Folder and Files in Computer Network


    You can share your computer folders and files in computer network, using the following methods.

    1.  At first, Go to your folder or file and right click on it, Choose "Share with" option and then click on "Specific people.." as on the screen below.
      How to Share Folder and Files in Computer Network
    2.  On the File sharing dialog box, choose people to share with, you can select specific computer or can choose everyone and click on "share" button at last.
      How to Share Folder and Files in Computer Network
    3.  If you want to Stop sharing them on computer network, Go to step 1 and choose "Stop sharing" option instead of "Specific people".
    4.  After clicking on "Stop Sharing" option, you can see file sharing dialog from where you can choose the option "Stop Sharing" - To remove all the permissions for all the people and "Change Sharing Permissions" option - To add or remove people or change the permission.
      How to Remove Shared Folder and Files in Computer Network
    5.  While changing permissions, you can do as given on the step 2.  

    Related Posts